
Most websites appear flat and static because they rely on long-form content, stock images, or banners that rarely get updated. Today’s visitors scroll fast and expect movement, authenticity, and freshness.
Many brands overlook the impact that short-form video can make—especially when you embed YouTube Shorts directly on their pages.
You’re not just adding video—you’re adding engagement. You’re building credibility through visual proof and reducing bounce rates with dynamic content.
Tools like Social Walls make embedding effortless, even for those with no coding experience.
Benefits of Embed YouTube Shorts on a Website
Boost Engagement & Visual Appeal
Visitors see video faster than text. When you embed YouTube Shorts on a website, you hook attention immediately with quick visuals. Shorts are designed to be snackable, making them perfect for increasing time on page and reducing bounce rates.
Keep Your Website Fresh Automatically
The moment you upload a new Short, your embedded feed updates. No manual uploading or editing. This turns your site into a constantly refreshed media space. A YouTube Shorts widget ensures your website never looks stale or outdated.
Strengthen Social Proof & Brand Authority
Short videos showcasing tutorials, UGC, reviews, or events feel more real than static photos. When visitors see consistent video activity, they perceive your brand as legitimate and active.
Drive Subscribers & Cross-Platform Traffic
When you embed YouTube Shorts, users are just one click away from subscribing. The embedded videos help convert website visitors into YouTube followers, increasing visibility across platforms.
Showcase Products, Features, & Announcements Quickly
Shorts are excellent for product demos, feature highlights, FAQs, unboxings, or updates.
Steps to Embed YouTube Shorts on a Website
Below is a beginner-friendly walkthrough explaining how to embed YouTube Shorts using Social Walls—without needing to code or modify complex scripts.
Step 1: Log in or Sign Up in Social Walls

Begin by visiting Social Walls. Log in, or create a new account if you’re using it for the first time. The dashboard allows you to manage multiple feeds, analyze performance, and customize layouts.
Step 2: Click “My Walls” and Create a New Wall
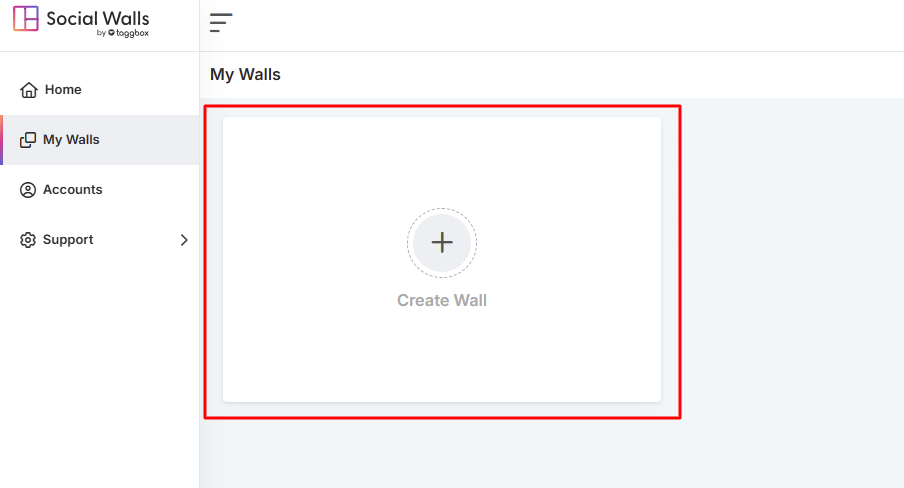
Click on My Walls, then select Create Wall. This is your workspace where you’ll design how your YouTube Shorts will appear on the site. A dedicated wall allows you to personalize the appearance, moderation rules, color themes, and layout.
Step 3: Name Your Wall Based on Themes, Events, and Campaigns
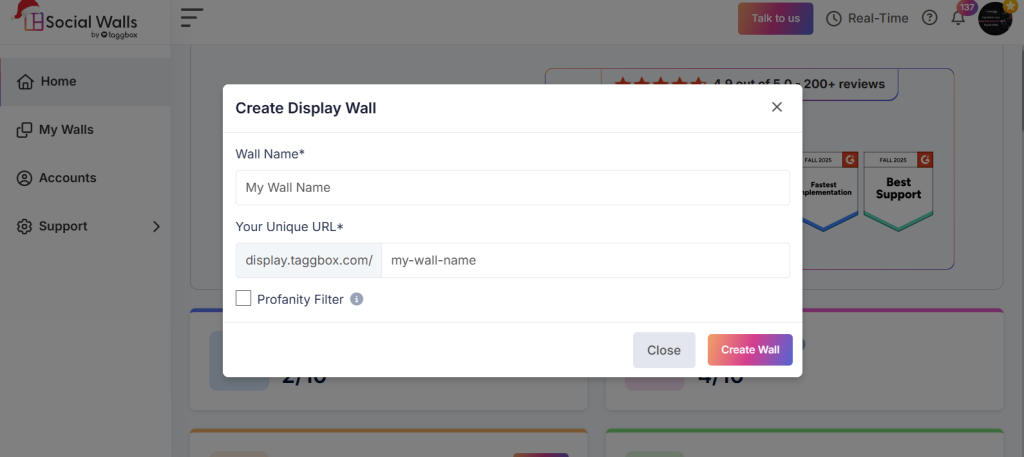
Choose a name that reflects your Shorts campaign:
- Product Demo Shorts
- Customer Review Shorts
- Behind-the-Scenes Clips
- Event Highlight Shorts
- Tutorial Series
Naming helps when you want to edit or compare performance later. Clear naming also matters if you plan to embed multiple walls across different pages.
Step 4: Select YouTube as Your Social Source

Now choose YouTube as the primary platform. Selecting YouTube connects your channel to the Social Walls platform. This ensures the feed pulls your Shorts accurately and maintains synchronization.
Step 5: Choose YouTube Shorts as the Content Type
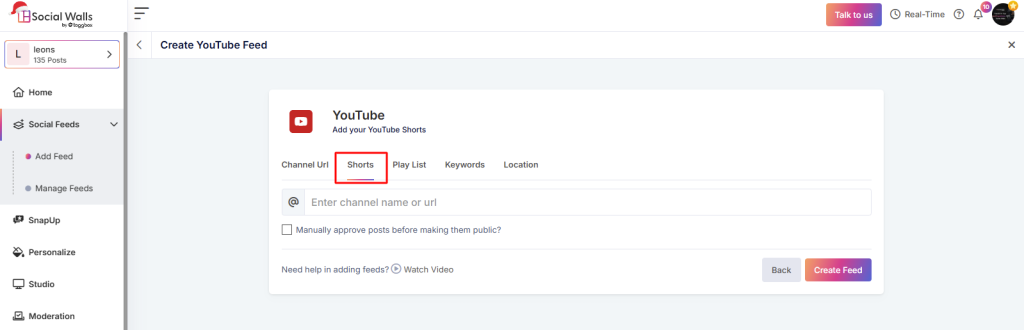
Here, you determine the content source:
- Channel uploads
- Short-only videos
- Playlist-based Shorts
- Keyword-based Shorts
- Hashtag-based Shorts
Selecting Shorts specifically ensures your feed displays vertical videos, not long-form YouTube content. This step controls whether your YouTube Shorts widget shows tutorials, product clips, or viral content.
Step 6: Customize the Design & Layout and Moderation
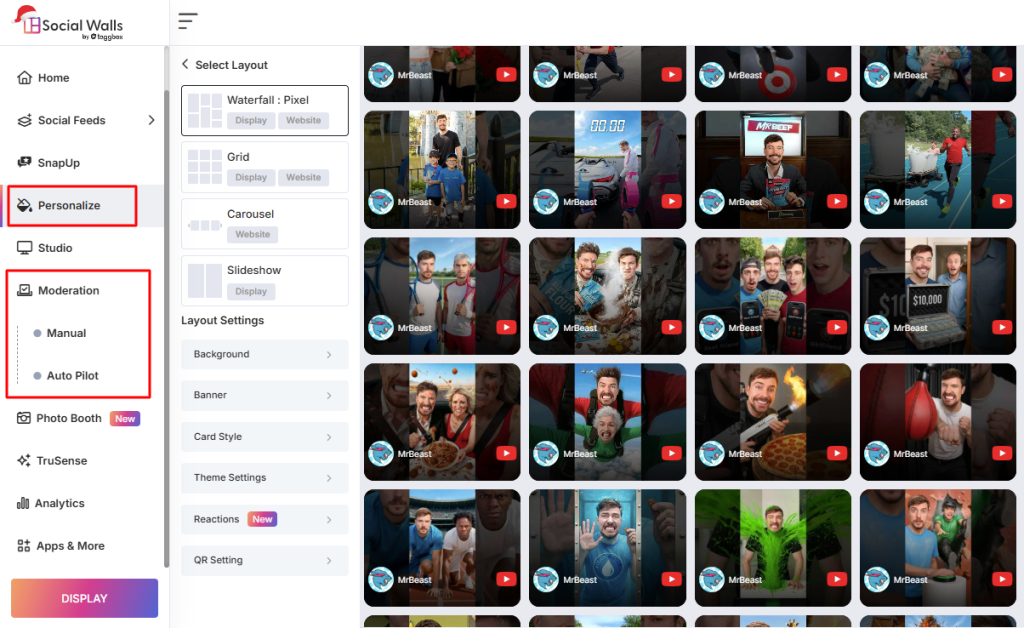
You can personalize:
- Grid or carousel layout
- Number of Shorts displayed
- Border styles
- Background colors
- CTA buttons
Customization ensures your embedded feed blends with website branding. If you run a professional site, minimal designs work well. If you run a lifestyle or creative site, bold coloring and dynamic layouts may be better.
Using moderation tools, you can:
- filter inappropriate content
- hide outdated videos
- select only specific playlists
- approve Shorts manually
This is essential for brands that must maintain a professional tone or remove inappropriate content.
Step 8: Click “Display” and Copy the Embed Widget

Next, click Display. You will receive an embed code for YouTube Shorts—Litecode, JavaScript, or iframe.
This code acts as the live connection between your YouTube channel and website. Each time you upload a Short, the feed updates without additional work.
Conclusion
Embedding Shorts is more than adding video—it’s a strategy. When you embed YouTube Shorts, you combine:
- visual storytelling
- real-time engagement
- brand credibility
- improved user experience
It reduces maintenance, boosts trust, and helps convert website visitors into video subscribers or customers. A YouTube Shorts widget is simple to install, updates automatically, and enhances both engagement and SEO. For brands wanting a dynamic, modern, and interactive website, embedding Shorts is one of the most effective upgrades.